What the process of (mentally) preparing for a branding photo shoot can look like, in my client’s own words.
I’ve had more than one message from past clients asking if they can download their photos again because they’re on their computer somewhere, but they just can’t find them, so I have a very strong feeling my tips might help.
And I get it!
When it comes to the photos I deliver to my clients, I have a totally water-tight system so that I can find their photos quickly and without any headaches.
But for some reason it took me a long time to prioritise organising my own personal brand photos, which meant that whenever I wanted to share a photo of myself, or if I was doing a guest post and was asked to send a photo, I had to go searching, would often just share the photos that were easiest to find (rather than the ones I really wanted to share) and I’d often just end up uploading the same photos over and over again. The extra duplicates just lead to more chaos, more headaches and the space on my hard drive and phone getting sucked up unnecessarily.
All of this takes time away from doing the ‘real work’, the kind of work that actually makes you money, that drives your business forward, and that actually makes you happy.
I want you to:

This is a mammoth post, I know, but it’s more straightforward than it might seem. My suggestion is that you schedule in time on your calendar to set up one system each day.
Click on the one that is most urgent for you to skip straight to that section, or work through the steps one-by-one:
The problem I used to have:
I had my own photos scattered on my external hard drive according to the date they were taken, but even though I usually had specific photos that I wanted to find, it took ages to go searching for them and I noticed I was avoiding sharing them because of that.
How having a system in place has helped me:
I can find all of the photos of myself without having to search for them, and if I know it’s a headshot I need, for example, I can filter those out so I don’t need to scroll through all the rest to find what I’m looking for.
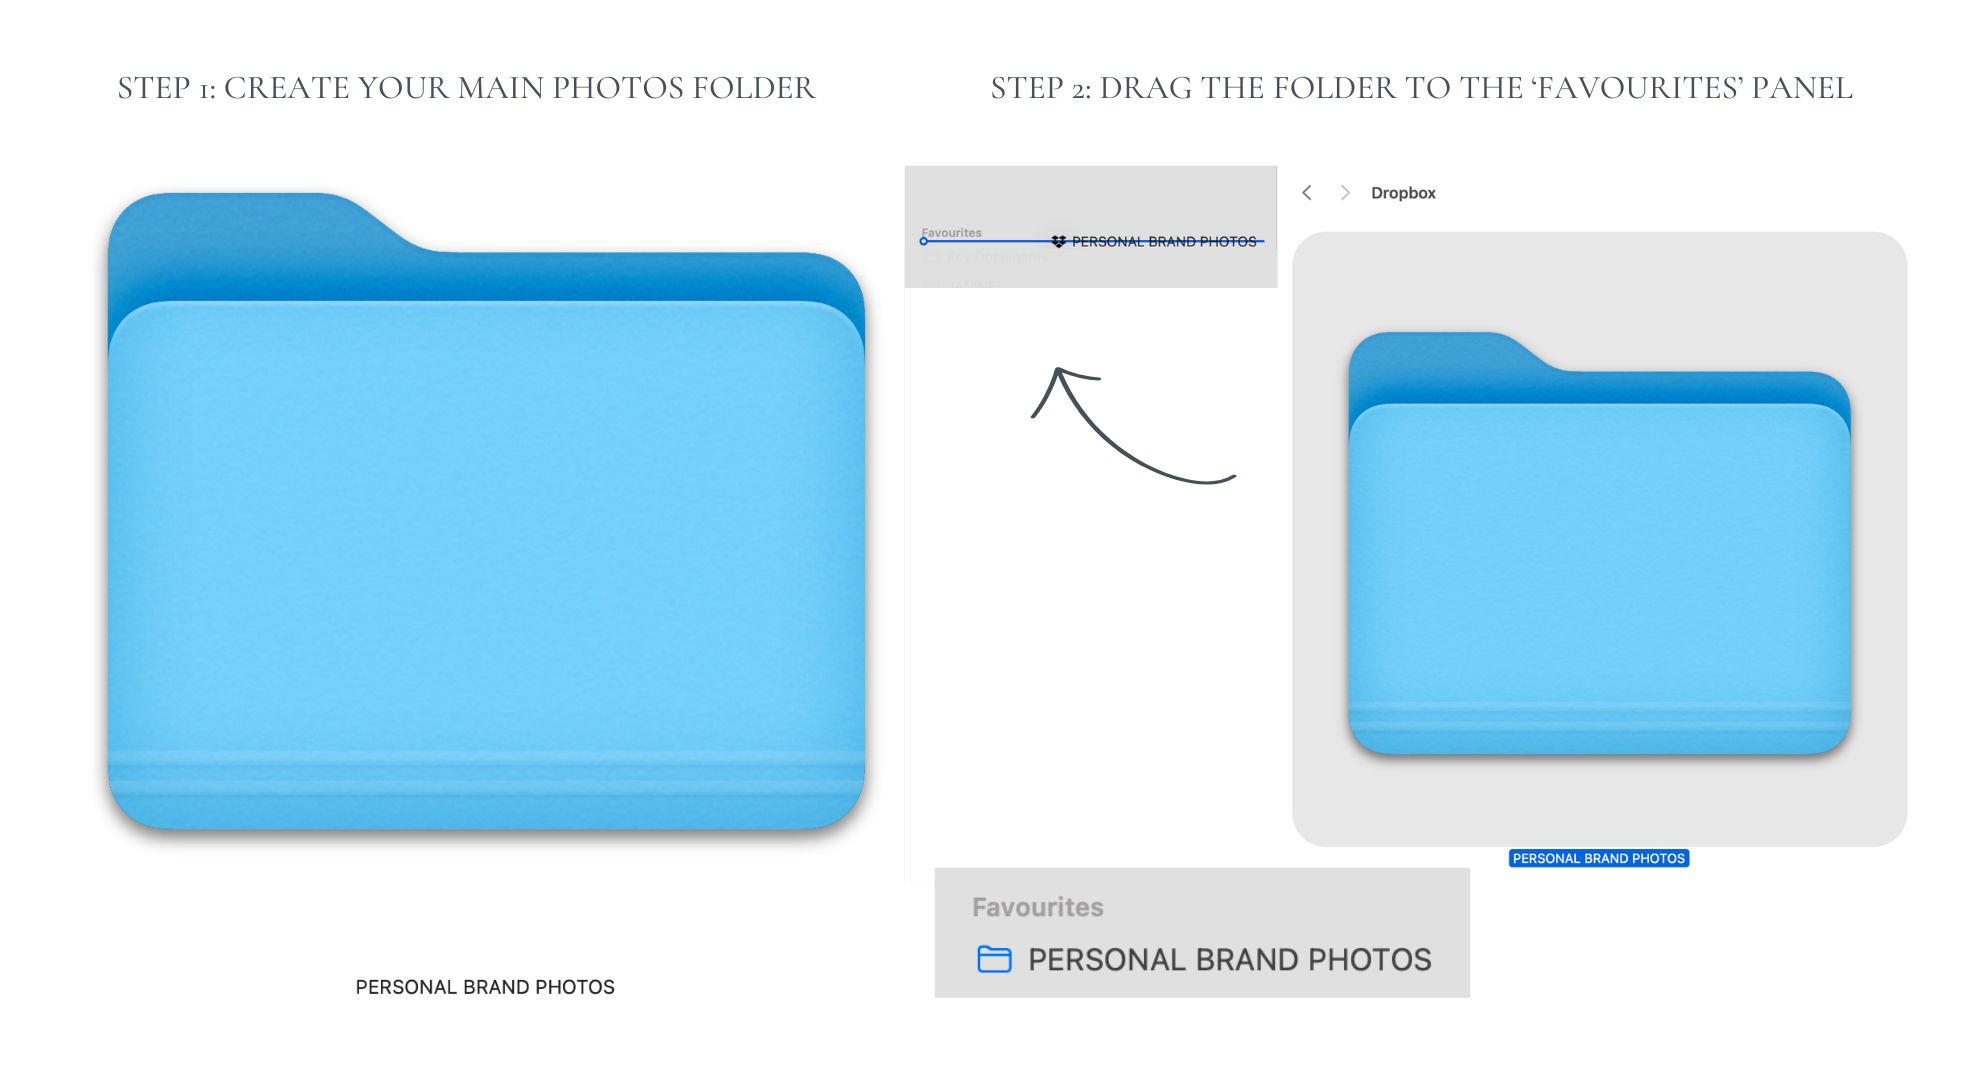
How to set it up:
PERSONAL BRAND PHOTOS (or whatever you’ve called your main photo folder)
2023
2024
(I number the ‘Photo shoot (Month)’ folders so that they stay in order.)
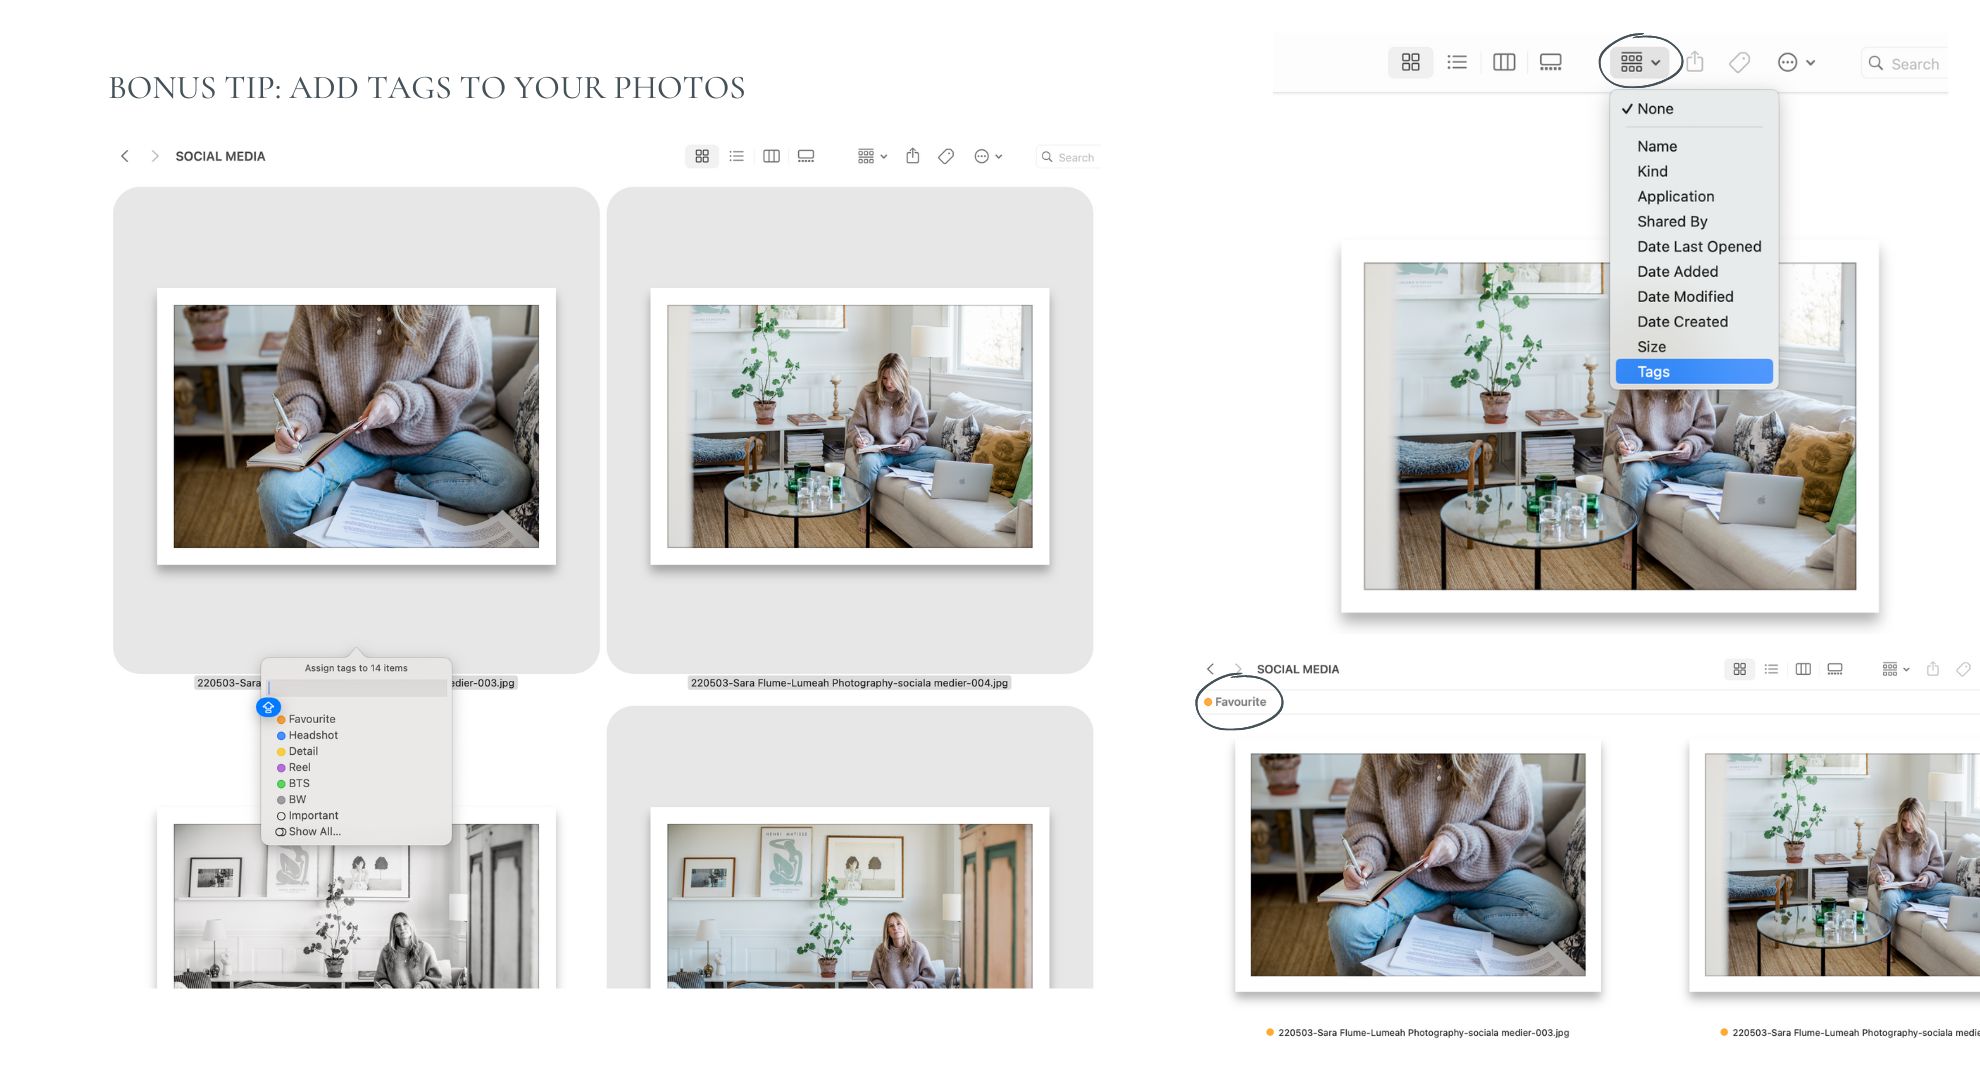
5. Lifesaving bonus tip: Add tags to your photos
Most likely you’ll have your favourite photos that you use often. Highlight those, right click and select ‘Tag’. Add a tag called ‘Favourites’ and choose a colour.
This might be enough for you, but if you want to take things up a level, you can think about the stories or themes in your image library and add tags based on those.
For mine, I’ve created tags for:
(Make life easy for yourself and highlight several photos at once and add tags to those, rather than right-clicking and adding tags to each individual photo.
(Again, this is the system I use for my iPhone and Mac. Tweak the process if you have something else.)
The problem I used to have:
I used to upload photos from Dropbox to my phone, but because I was on the go I was usually in a hurry and just left them in the main photos folder. All jumbled up. It meant that the next time I needed to access a photo on my phone (and was in a hurry again) I’d just upload it from Dropbox again. Which meant chaos, stress and all of the duplicates were taking up precious space on my phone (meaning I had to pay for extra storage).
How having a system in place has helped me:
I know exactly where my personal brand photos are and can access them in a matter of seconds. (This is a very basic system, but sometimes you know you should do something, but it takes someone setting the challenge for you to actually get it done.)
How to set it up:
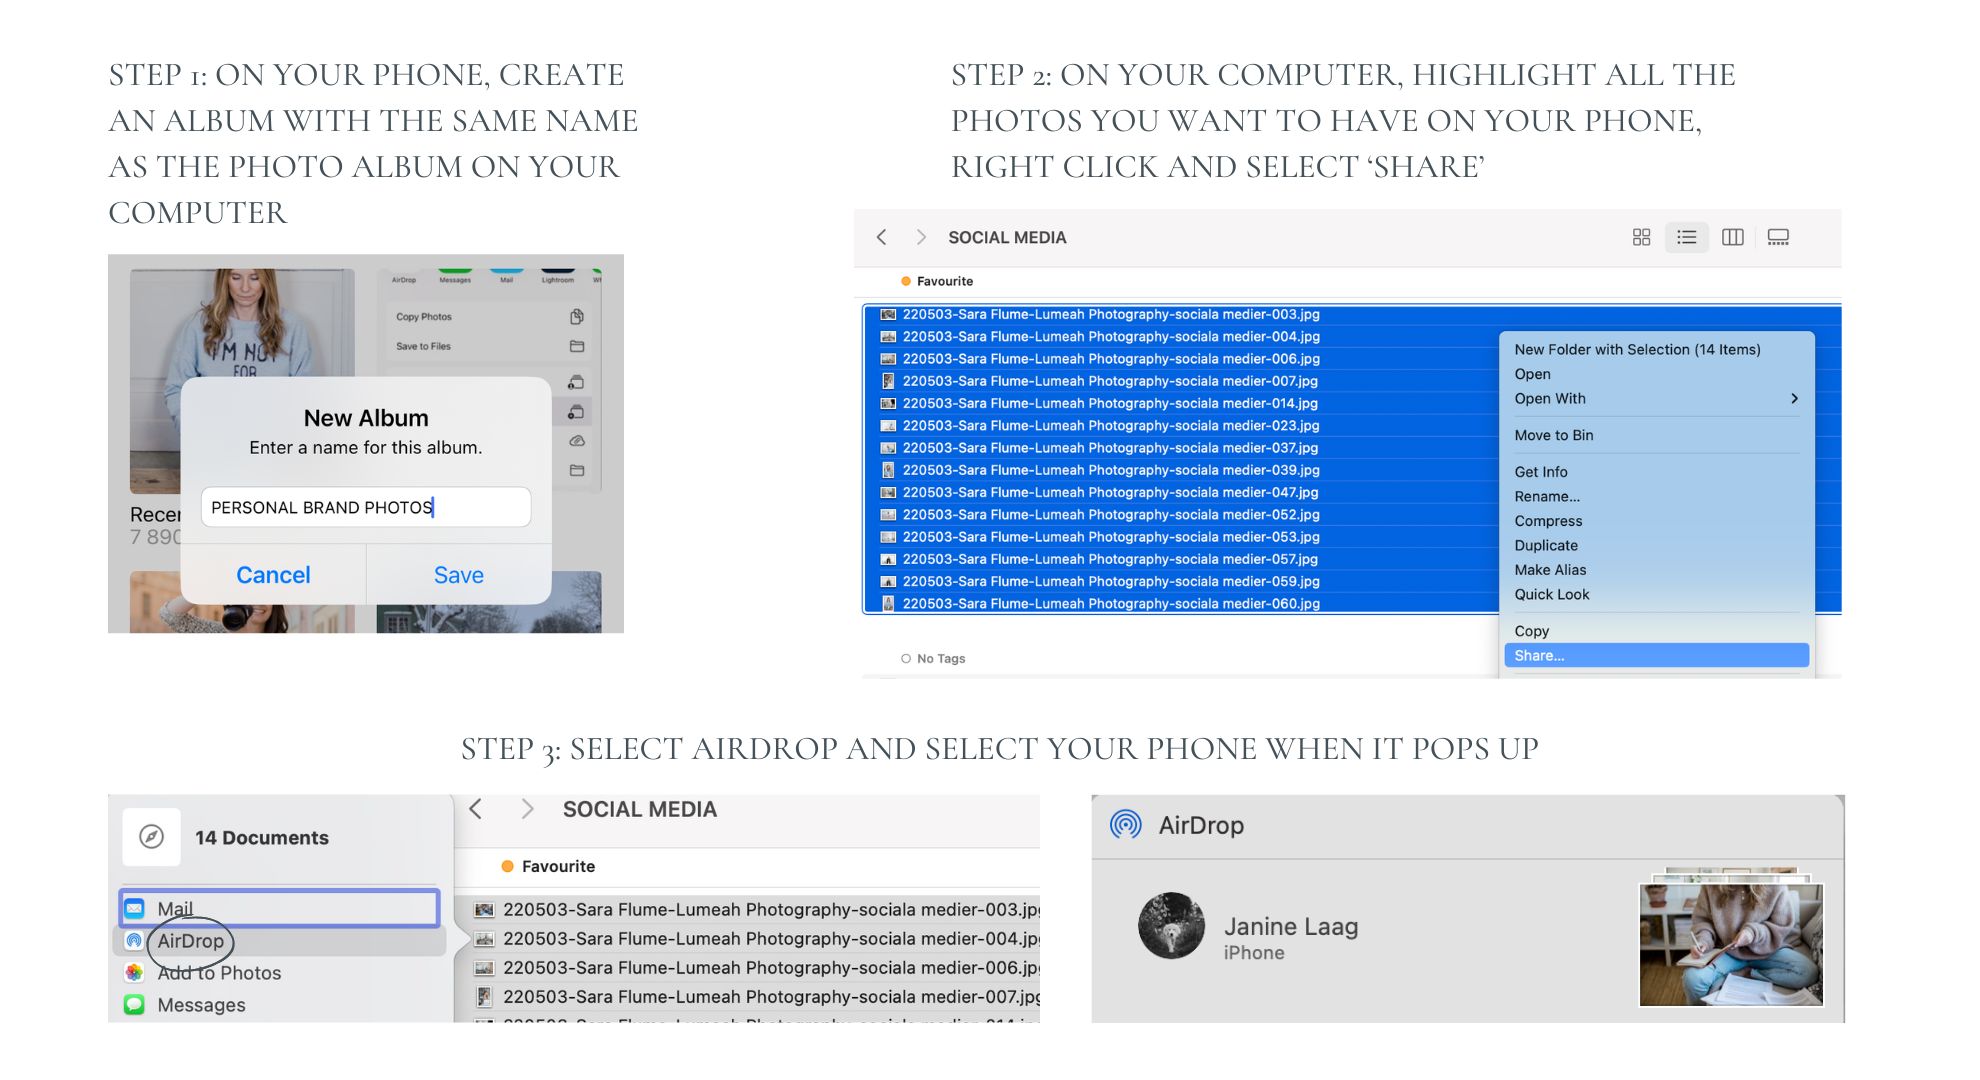
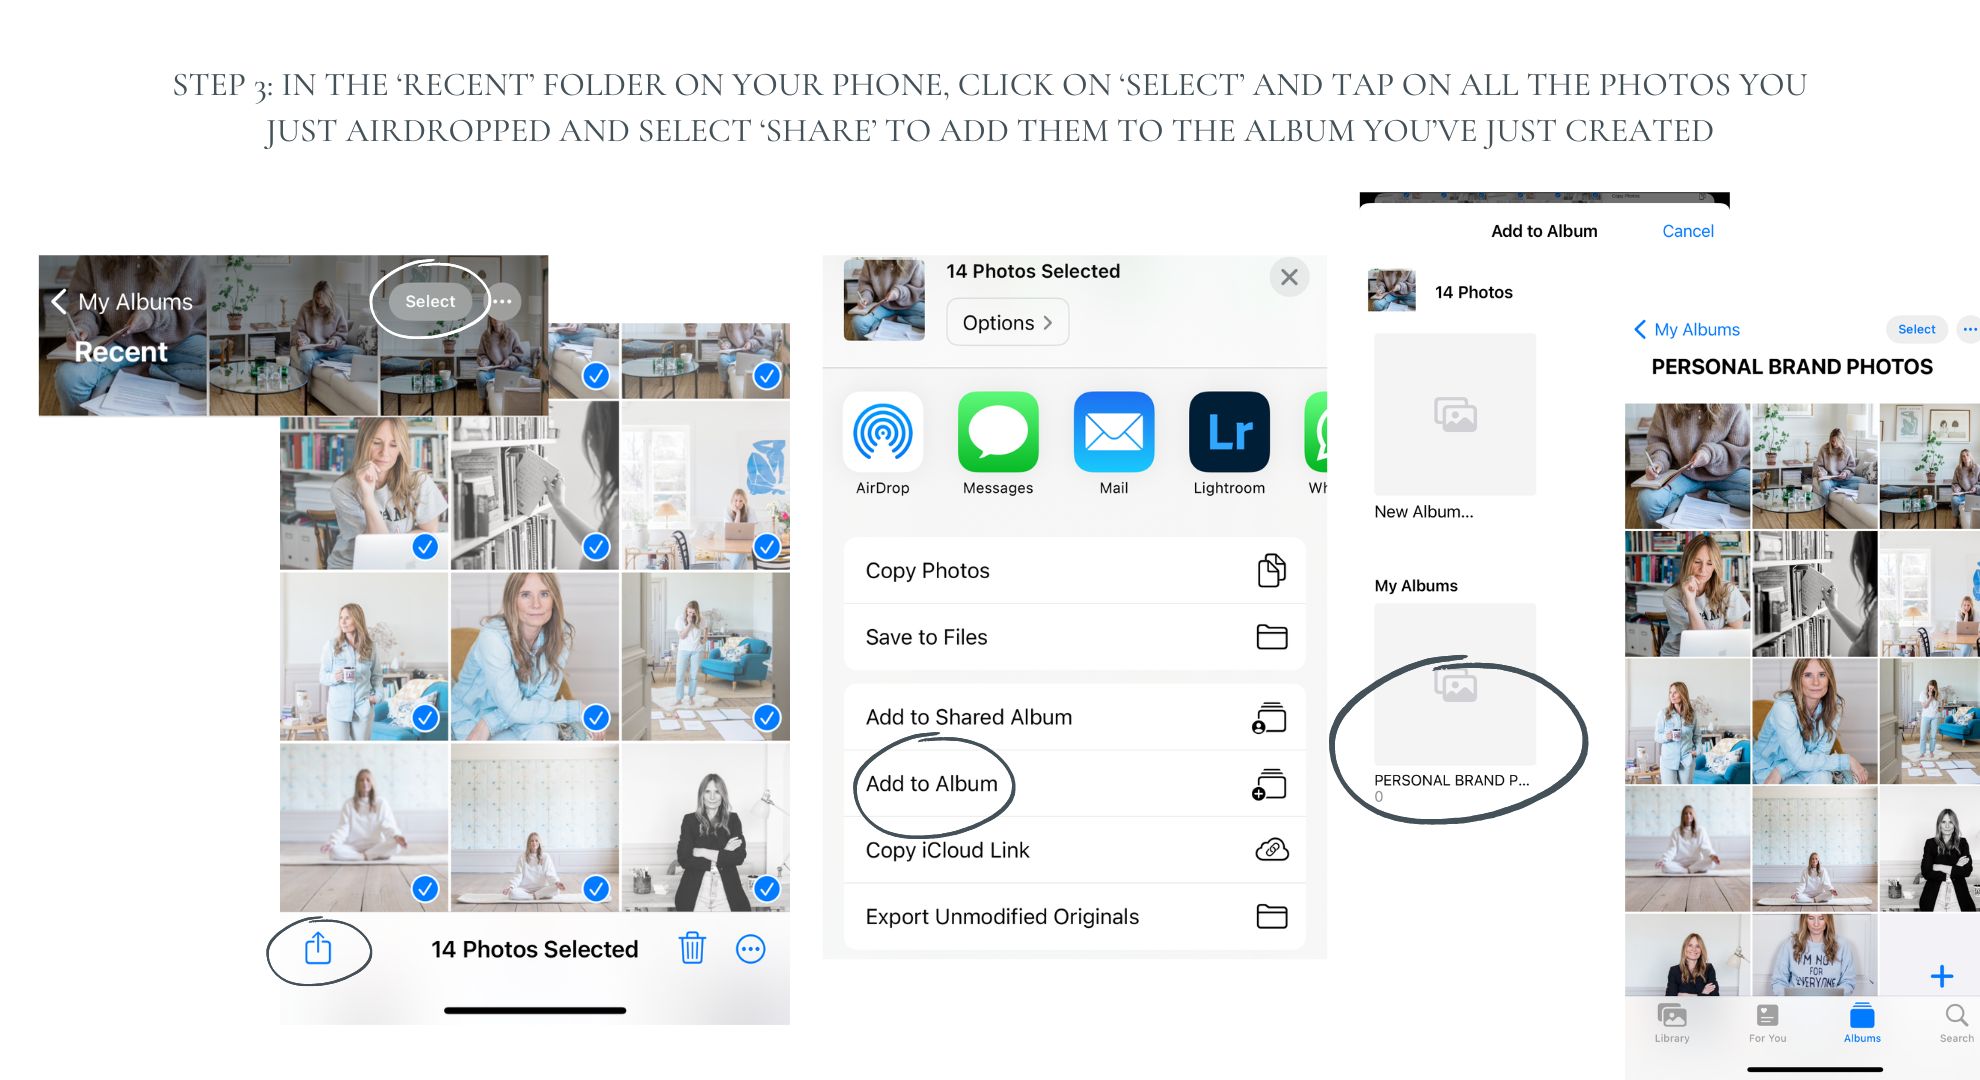
The problem I used to have:
I would start thinking about the design I wanted to create, get lost in all the pretty templates, just upload photos and get on with designing my post. Then I’d want to use the same photos again, but couldn’t find them so I’d just upload the same ones over and over again until I was left with a jumbled mess of random photos in the upload folder. To save time I’d keep using the photos that were easiest to find, instead of actually being intentional about the photos I was using in my designs. I started avoiding creating graphics because I just didn’t want to deal with the chaos and stress.
How having a system in place has helped me:
This step was a hallelujah moment for me! It may have been obvious to everyone else, but it took me a while to realise there was a MUCH better way of doing things. Instead of just clicking on ‘Upload’ and having all of my photos all jumbled up in one folder, not being able to find anything and then just uploading the same photos again, creating an organised system for my own and my client’s photos has been a game-changer! (And if you’re not a photographer and only have photos of yourself to organise, this will be even easier.)
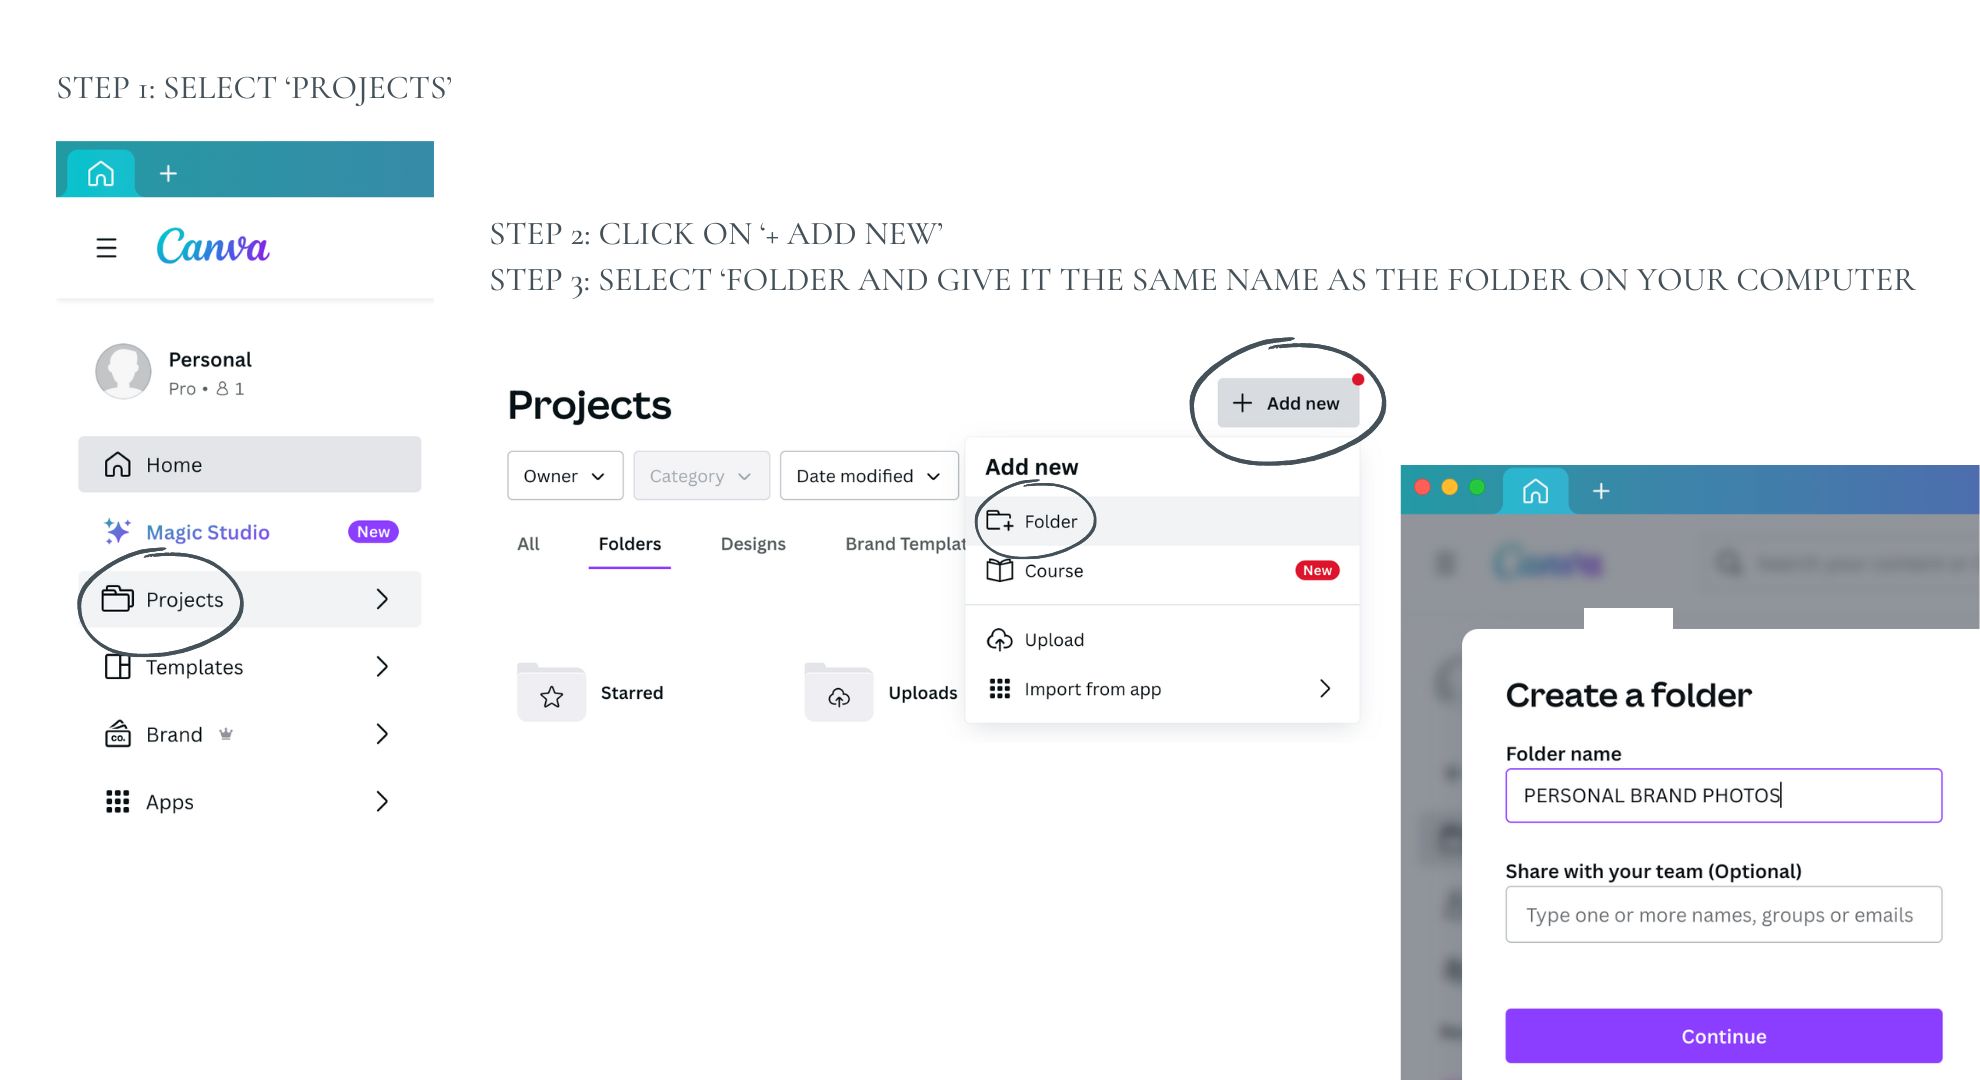
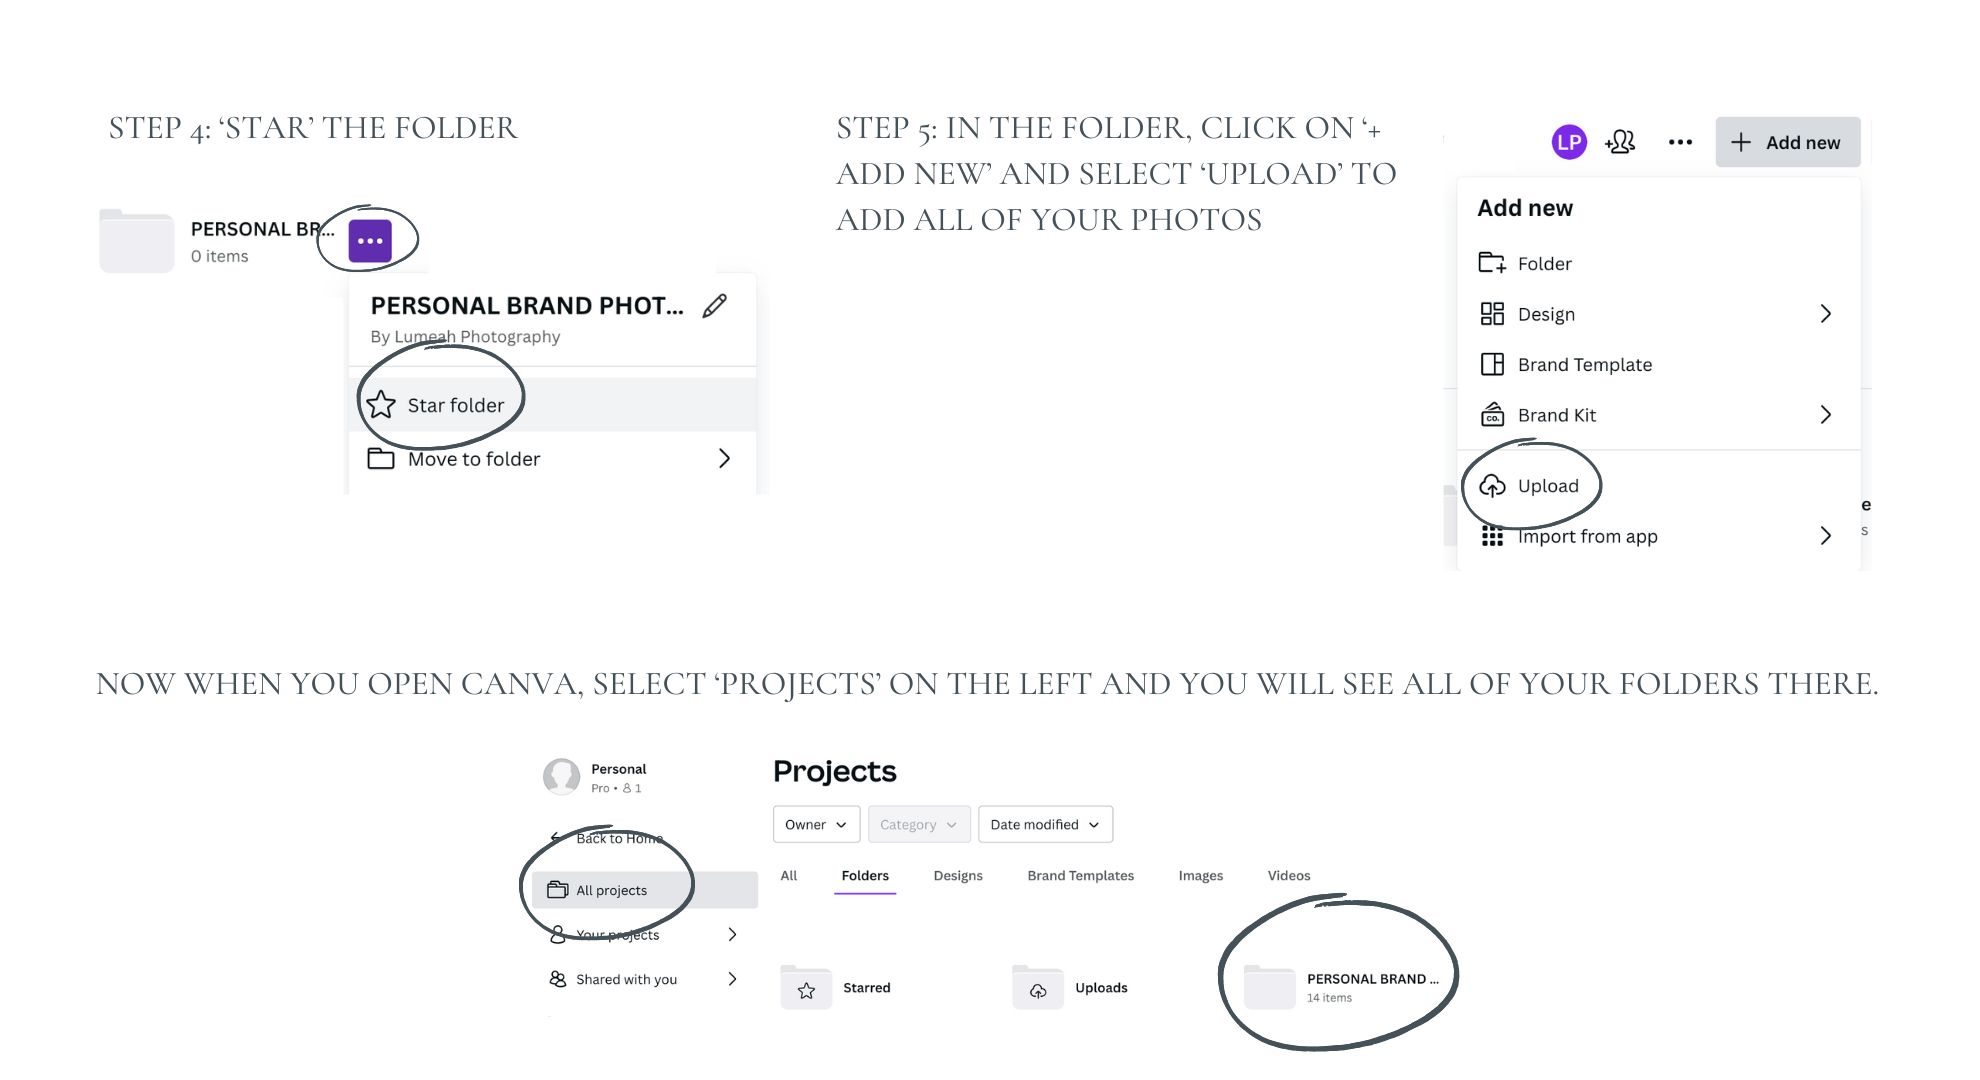
How to set it up:
When you open Canva to the home page, you’re faced with your ‘Latest designs’, which is just a jumbled mess of designs. But if you just ignore this page and click straight on ‘Projects’, you’ll see all of your folders sitting there, including the folder with all of your photos. If you are working on a design and want to add one of your photos, click on the ‘Projects’ symbol on the left and navigate to your photos folder.
(Bonus tip: What’s also been a gamechanger for me has been creating separate folders for the different types of designs I use regularly: Instagram posts, IG carousels, A4 lead magnets etc. The trick is then making sure any design you create is saved into the right folder so you can find it easily and reuse it.)
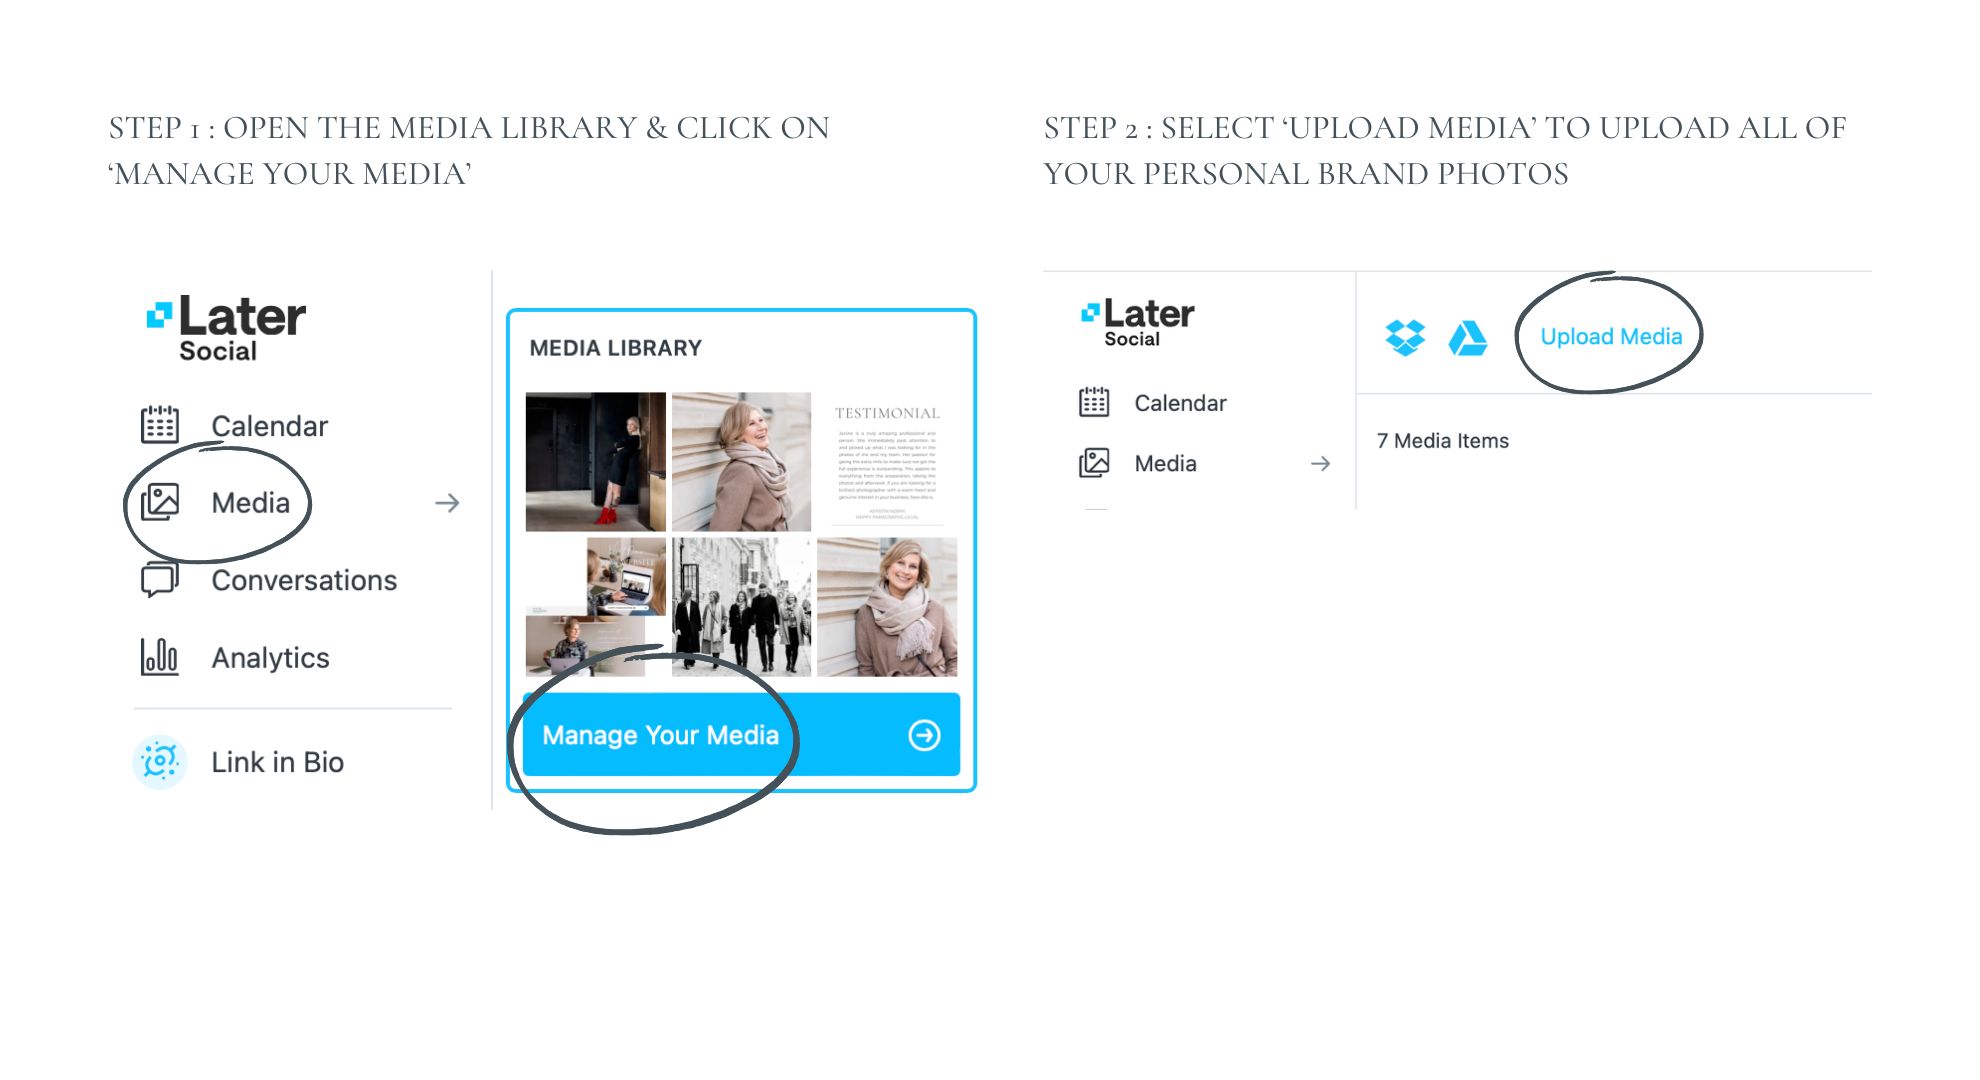
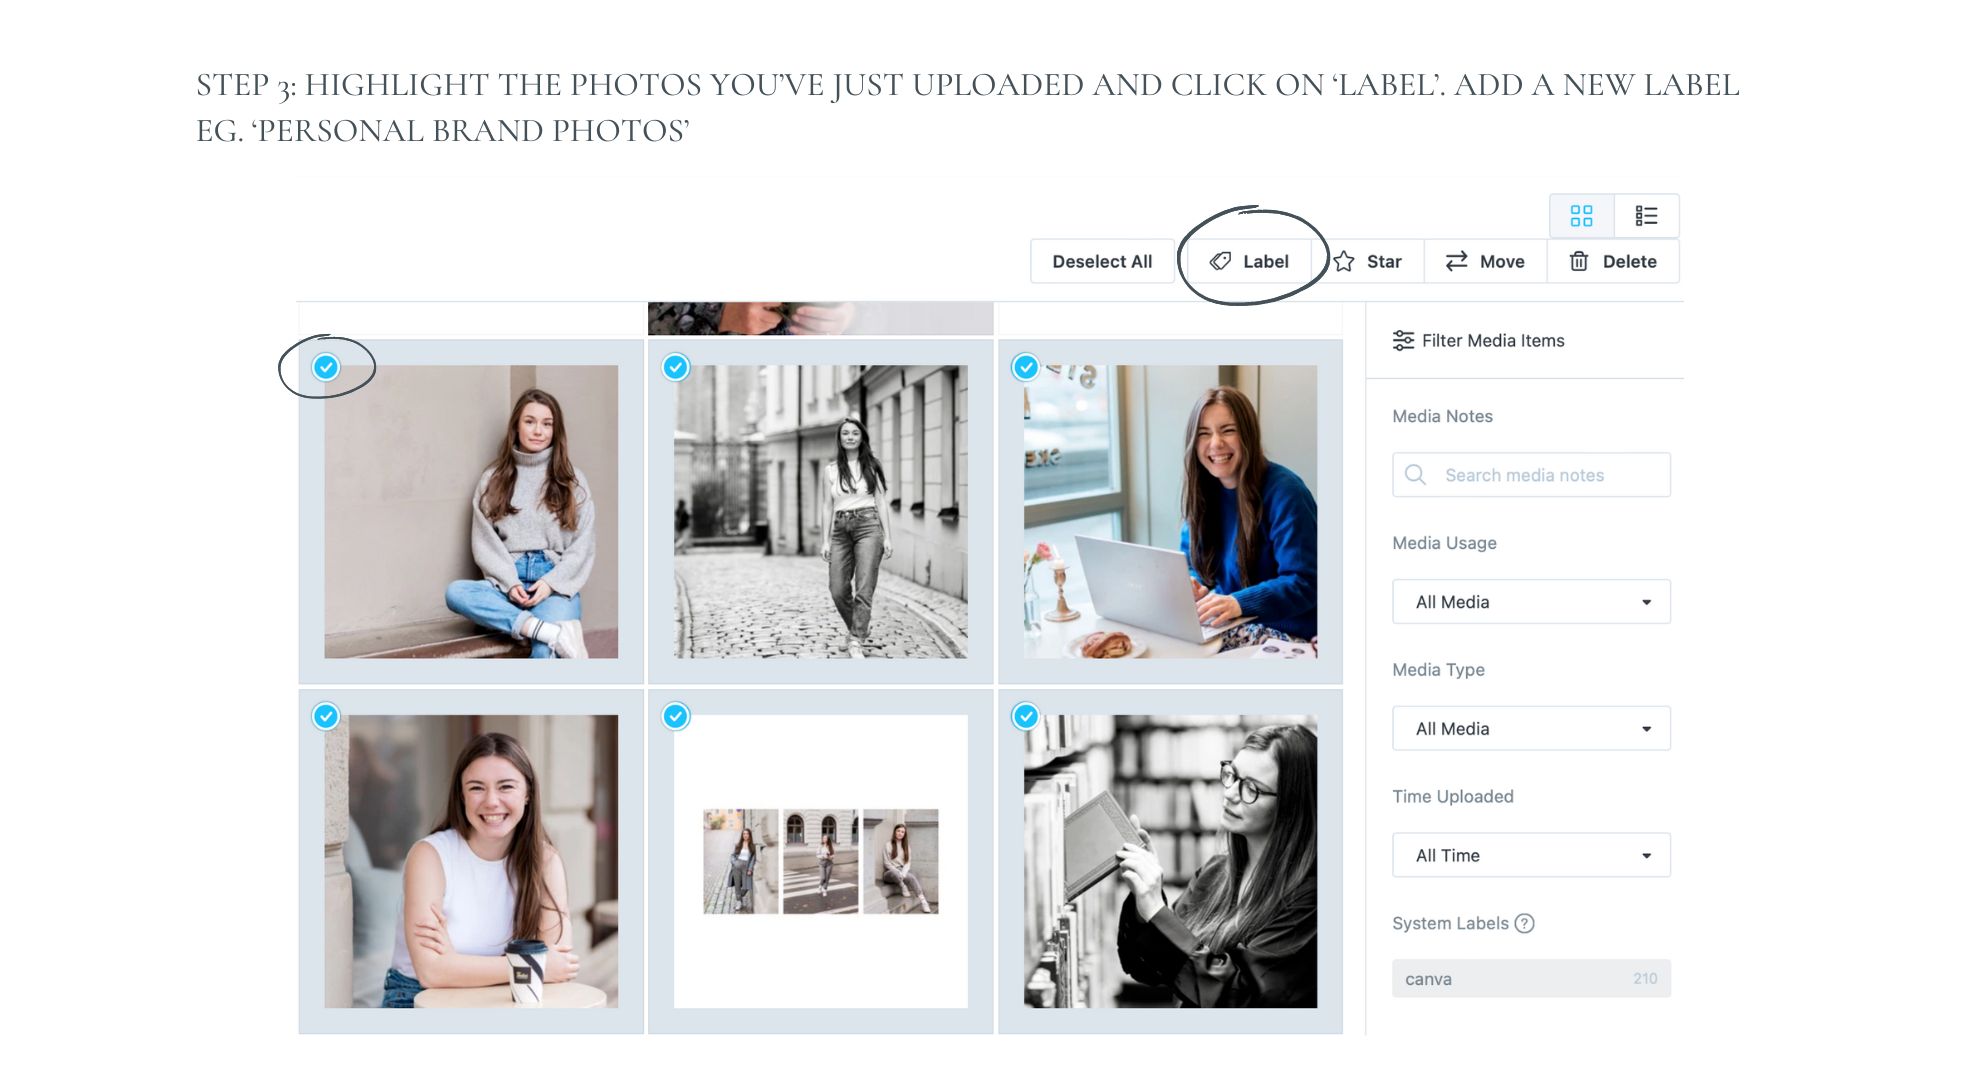
(I use Later to schedule my social media posts, but you might be able to apply these steps to other apps.)
The problem I used to have:
I would open Later, upload a bunch of photos, create a few posts and schedule them. Then after a while I would want to post one of the photos I knew I’d already uploaded, but it was all just a jumbled mess in the Media Library, so I had to scroll for ages to find the photo I had in mind. Or, more often than not, I would just upload the same photo again – which meant my library was full of duplicates. I got into the habit of resharing the same photos over and over again because they were the ones that were at the top of the list and easiest to find.
How having a system in place has helped me:
If I have a specific photo that I want to share, I can quickly and easily find it and schedule a post. I have a few favourite photos and graphics that I know I’ll share more than once, and I can easily find these now so I don’t have to waste time (or headspace) searching.
How to set it up:
Super bonus, lifesaving tip: Did you know that you can connect Later with Canva, so you can share your Canva graphics straight into Later without downloading them first and then uploading them? Which means a lot of saved time, fewer downloaded files taking up space on your computer and a lot less hassle. Let me know if you want me to show you how to do this.

Let me know in the comments if this was helpful for you. Did you already have a similar system in place? Any surprises?

What the process of (mentally) preparing for a branding photo shoot can look like, in my client’s own words.

YOUR COACHING PHOTOS A lot of people tell me that they don't know what personal brand photos they should be sharing in their coaching business. It can help to see things from a potential clients'...
Let's talk. If you know you know you need new photos, but aren't sure what photos you need or which package might be right for you at the moment, let's book in a digital fika and talk it over.
These aren't typical sales calls where I pressure you. My job isn't to convince you that I'm the right photographer for you and to push you to book. This is a chance for us to get to know each other, work out if we're a good fit and to see how we could work together.
0 Comments